Smart Money Concepts Trading Strategy Explained (Step-By-Step)

If you’re looking for a simple but effective Smart Money Concepts trading strategy, this post walks through the full process I use in my own trading, start to finish.
I’ll show you how I approach market structure, liquidity, and execution, and how my SMC strategy ties everything together into a clear, repeatable framework.
There’s no theory overload or indicator noise here. Just a practical way to read price, wait for confirmation, and execute trades with more confidence in the forex market.
This is the same strategy I use day to day, built around clean price action and objective rules rather than opinions or hindsight.
Who This Is For
This guide is for traders who already understand the basics of Smart Money Concepts but still struggle to turn those ideas into consistent execution.
If you feel like you understand structure, liquidity, and fair value gaps, yet still find yourself entering too late, chasing moves, or getting stopped out unnecessarily, this will help you tighten things up.
It’s especially useful if you’re looking for a clear SMC trading strategy that starts with higher-timeframe context and ends with logical entries, stop placement, and targets, instead of guessing or reacting emotionally.
Step 1: Define Market Structure on the Higher Time Frame
Every solid Smart Money Concepts trading strategy starts with market structure.
That part is non-negotiable.
Before I think about entries, Fair Value Gaps (FVGs), or Fibonacci levels, I want to understand what the market is actually doing at a structural level.
In simple terms, I’m asking one question:
What is price telling me right now?
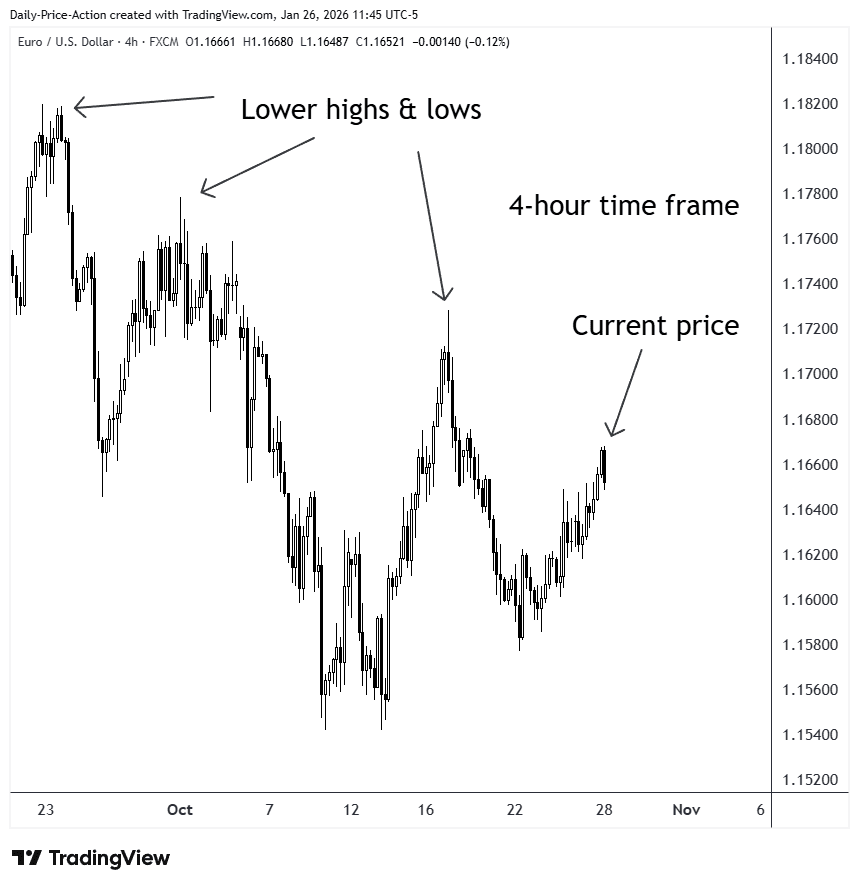
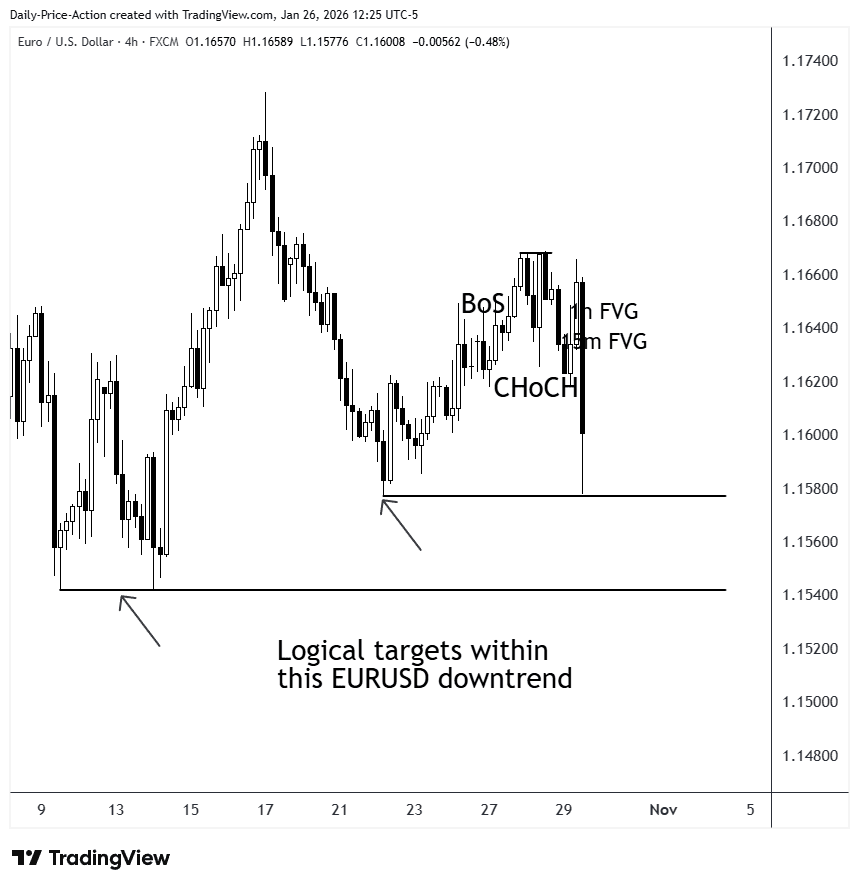
In this example, I’m looking at EURUSD on the higher time frame. At first glance, price may look like it’s starting to move higher. But when you zoom out, the bigger picture is clear. The market has been making lower highs and lower lows for some time, which tells me the overall trend is still down.
That higher-time-frame context matters. If the broader structure is bearish, any move higher could just be a pullback or short-term relief before price pushes lower again.
This is why higher-time-frame market structure is so important in SMC trading. It helps you understand market direction, avoid fighting the trend, and frame every trade idea with the right context before moving down to execution.
Step 2: Identify External Highs and Lows
The next step in my Smart Money Concepts trading strategy is identifying external highs and lows.
These levels matter because they often sweep internal structure, take liquidity, and show where larger market participants may be active. This is where market structure analysis starts to move from random price movement to clear intent.
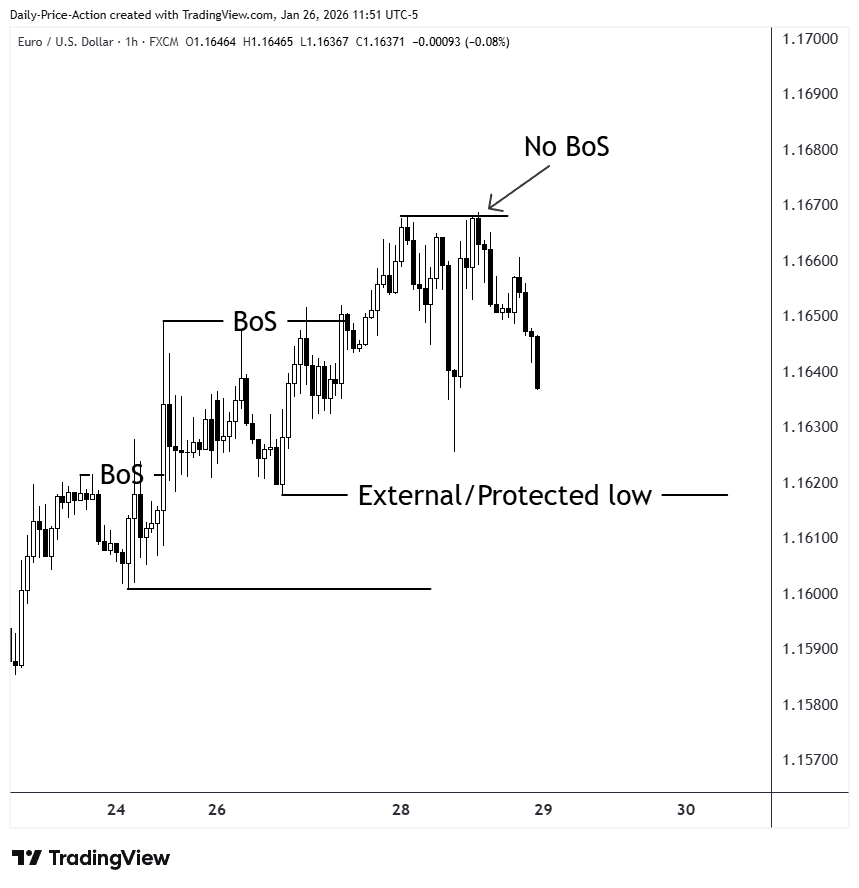
In this example, price pushes higher after taking internal lows, but that alone doesn’t confirm anything. At this point, an external low may be forming, but it’s not valid yet.
I’m not interested until price confirms it.
That confirmation comes from a clean one-hour break of structure. It needs to be a real candle close through structure, not just a wick. When that happens, it tells me price is shifting and gives me a clear reference point to work with.
Once that break of structure is in place, the external low is confirmed and I finally have something solid to build the rest of the strategy around.
Step 3: Confirm Direction with Change of Character
After a break of structure, I pay close attention to how price reacts. This helps me decide whether the move is real or just a temporary pullback within the current trend.
If price is simply correcting inside a larger downtrend, sellers should eventually step back in. I’m not guessing or predicting here. I’m waiting for price to confirm it.
That confirmation comes from a change of character. This is one of the clearest market structure signals you’ll see in Smart Money Concepts trading, especially when you’re focused on market sentiment and intent rather than indicators.
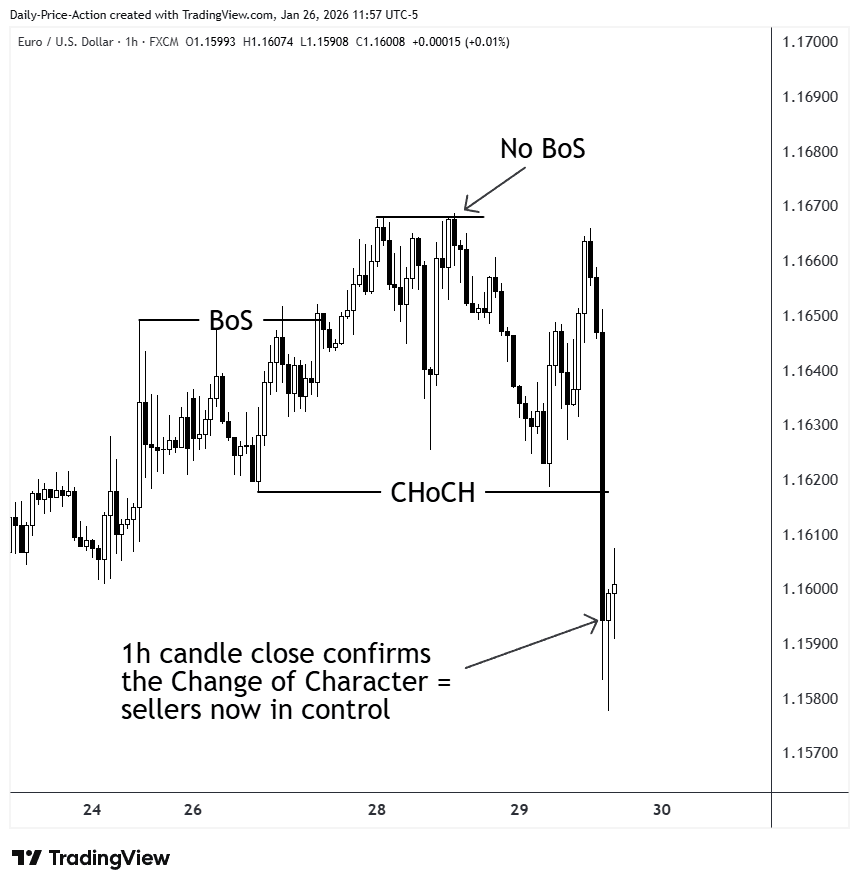
In this case, price fails to make a higher high and then closes strongly lower on the one-hour chart. That tells me sellers are back in control and the shift in direction is real.
This is the first true layer of confirmation in my trading approach. Once I see this, direction is no longer an assumption. It’s been confirmed by price action.
Step 4: Mark Premium and Discount Using OTE
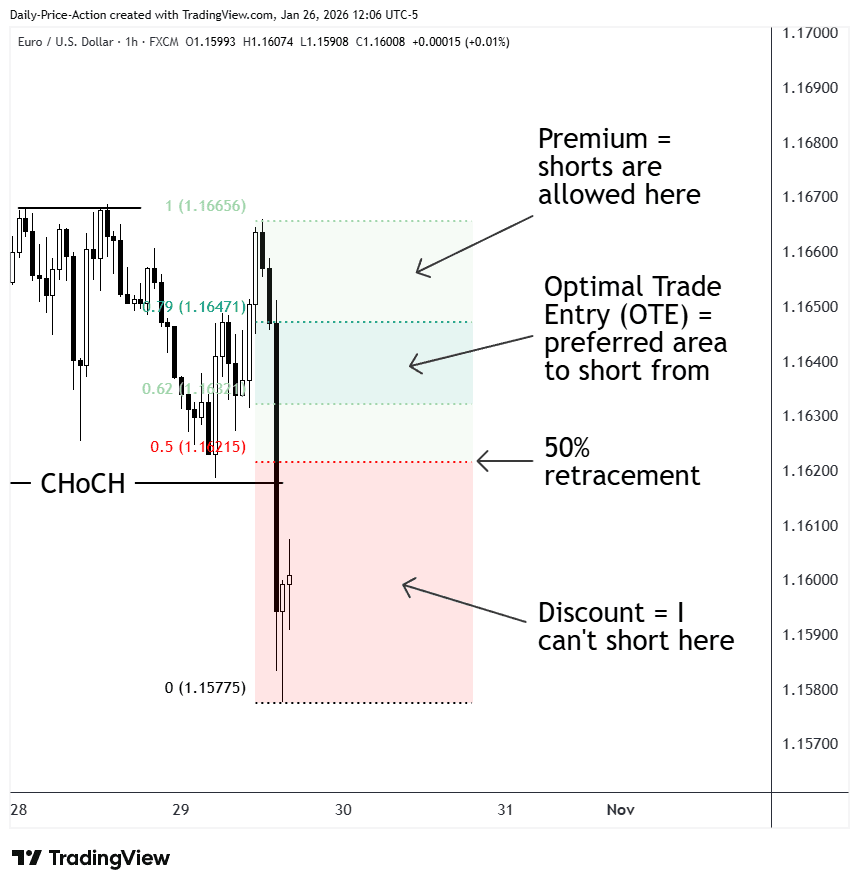
Once I have a confirmed change of character, I move to Fibonacci to define premium and discount. I use a simple, modified Fibonacci that makes this clear, with the 50 percent level acting as the dividing line.
After a bearish change of character, I only look for short trades in premium. Anything below the 50 percent level is discount, even if price drops fast and looks tempting. If it’s not in premium, I’m not interested in shorting.
This rule keeps me aligned with the current trend and prevents me from reacting emotionally to short-term price movements. Markets often retrace more than many traders expect as part of normal price returns and rebalancing.
By waiting for premium and using Optimal Trade Entry (OTE) as a guide, I stay patient and let price come back to me.
This approach fits naturally into my Smart Money Concepts trading strategy and helps me avoid chasing moves that market makers often fade.
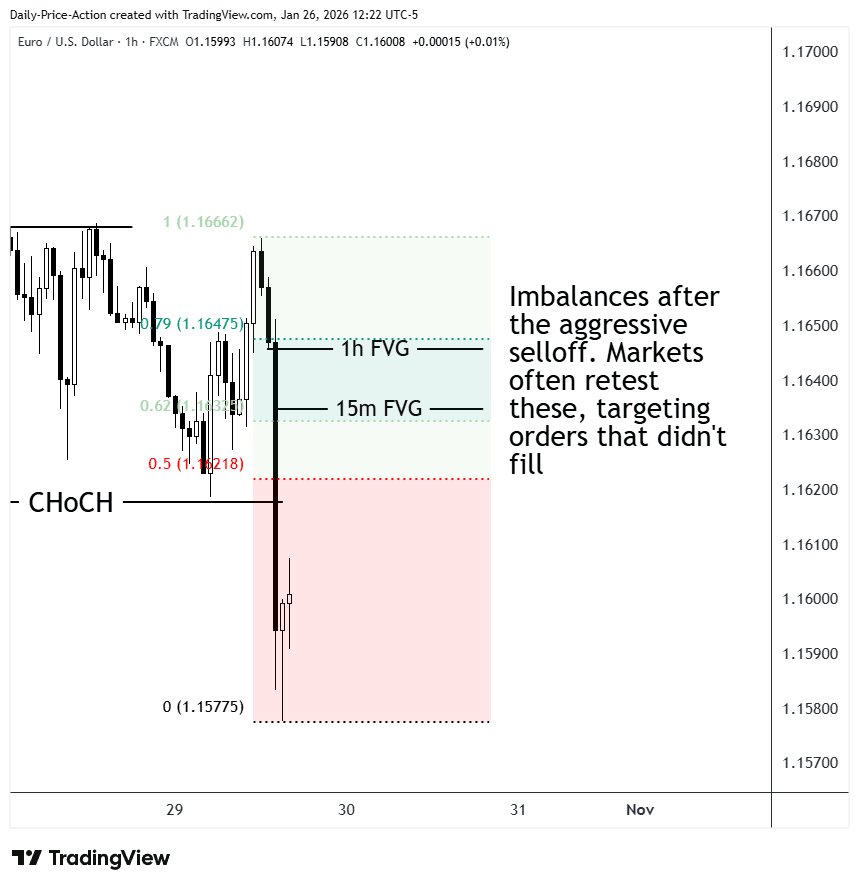
Step 5: Define Areas of Interest with Fair Value Gaps
Next, I look for fair value gaps, also called FVGs, as part of my Smart Money Concepts trading strategy. These form when price moves aggressively and leaves behind inefficiencies, which often reflect institutional order flow and get revisited later.
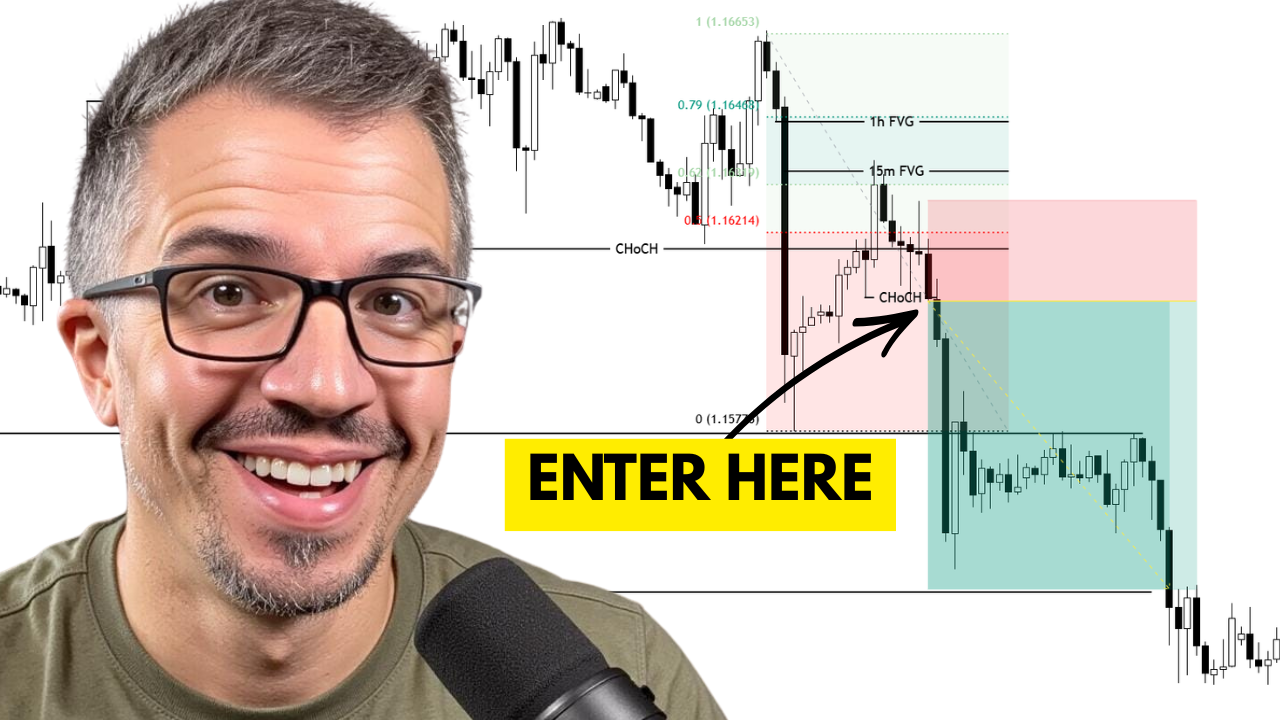
In this example, there is a clear one-hour fair value gap sitting inside the OTE zone. That gives me an area of interest, not an entry. It simply highlights where price may react based on prior market behavior, not where I blindly place a trade.
From there, I drop to the 15-minute chart. If I see a fair value gap on the lower time frame that lines up with the one-hour gap and OTE, the setup becomes much stronger and adds more market context.
Now I have multiple time frames pointing to the same region. This helps me focus on the most important price levels and better interpret market movements, instead of reacting to every candle or short-term fluctuation.
Step 6: Pre-Plan Targets Before the Entry
Before I ever think about entering a trade, I already know where price is likely to go. I do this by marking logical targets using structure, prior highs and lows, and obvious liquidity zones on the chart.
In this example, the first target is a prior low. That’s a natural place where price may pause or react.
The second target sits below equal lows, where liquidity is often resting and sell orders tend to stack. Markets are always seeking liquidity, and these areas give me clear, realistic expectations for potential price movements.
Planning targets ahead of time keeps me objective. I’m not making decisions in the moment or reacting emotionally to fast moves. Instead, I’m letting market conditions and structure guide the trade from the start.
This step also helps with trade management. If the targets don’t make sense based on the current trend or overall market context, I know the setup isn’t worth taking.
By pre-planning targets, I stay aligned with my Smart Money Concepts trading strategy and avoid forcing trades that don’t offer clean follow-through.
Step 7: Wait for Lower Time Frame Confirmation
This is where everything comes together.
Once price reaches my higher time frame area of interest, I drop to the lower time frame, usually the five-minute chart. Even though the higher time frame bias is clear, price can still move against it internally for a bit. That’s normal market behavior.
I don’t enter right away. I wait for confirmation.
What I’m looking for is a clear change of character on the five-minute chart. That means price breaks structure, takes out the most recent internal low, and closes below it. Until that happens, I stay patient. This is where most traders jump in too early and get caught.
Waiting for this confirmation helps filter out low-quality setups and keeps me focused on higher probability trading opportunities that align with my Smart Money Concepts trading strategy.
Step 8: Execute with Lower Time Frame Confirmation
In this example, price gives an even cleaner signal by forming a lower high and then breaking structure on the lower time frame.
This is what I call a stronger change of character. It tells me momentum is now shifting in line with the higher time frame bias and that downside continuation is more likely.
This is my trigger.
At this point, I’m no longer guessing or reacting to price. I’m executing a plan based on structure, liquidity, and confirmation across multiple time frames. Everything lines up, and the trade fits naturally within my overall smart money approach.
Step 8a: Define Entry, Stop Loss, and Invalidation
Once the five minute change of character is confirmed, I consider the entry using this SMC forex trading strategy, and it is how smart money trading works in real time on trading charts.
My stop loss always goes at invalidation, not a random number.
If price takes out the lower high that formed before the break, the idea is wrong, and that is where my stop goes as part of proper risk management and to help me manage risk.
A stop loss has two jobs: protect capital and invalidate the trade idea.
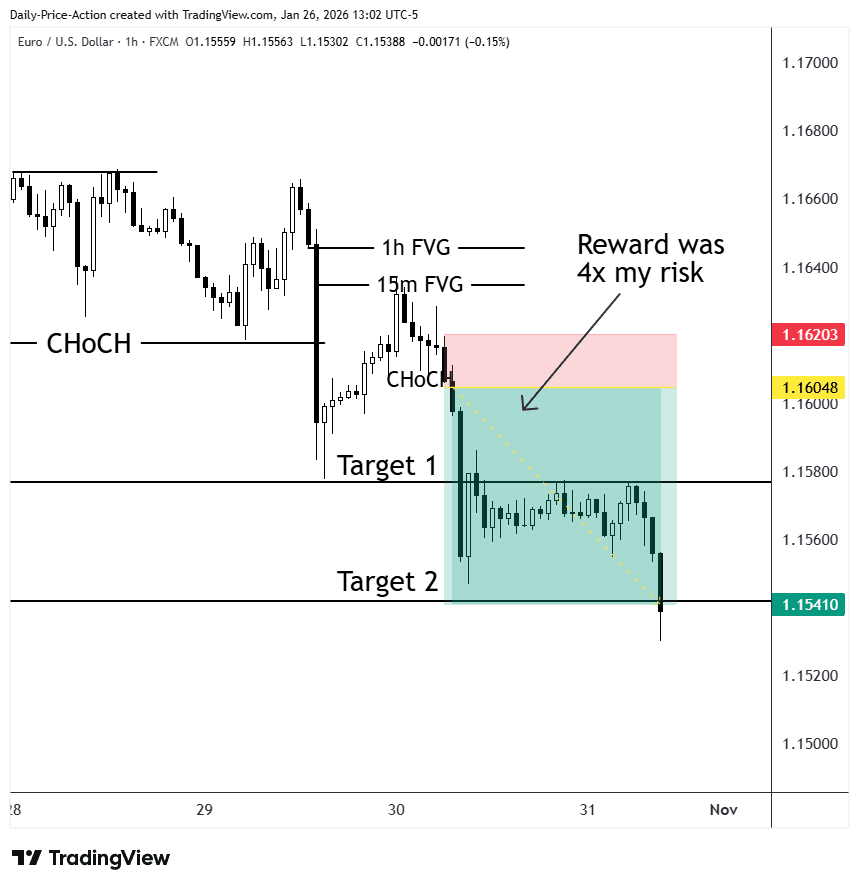
Step 8b: Check Risk to Reward
Before entering, I check risk to reward, and my minimum is 3R so I can manage risk and avoid excessive leverage. The term “3R” is the shorthand version of a reward that is three times the risk.
In this case, the setup offers just under 3R to the first target and more to the second, which is good enough for me.
I am not interested in perfect numbers. I am interested in consistency.
Managing the Trade
When the first target is hit, I take partial profits and keep things simple, regardless of trading volume noise in between.
From there, I let the rest run toward the second target, understanding that price may go sideways along the way.
As long as structure holds, I stay patient, and in this example, the first target is hit quickly while the second target is reached later as liquidity below the lows is taken.
That is the market understanding piece most individual retail traders miss when they focus only on indicators.
Why This SMC Entry Model Works
Nothing about this model is complex. It is mechanical, rooted in price action, and starts with structure.
It is not about fancy technical indicators or guessing what algorithmic trading will do next, it is about market structure shifts and market participants.
It uses OTE to keep me patient and fair value gaps to define areas, while waiting for lower time frame confirmation before entering.
That is how I make more informed trading decisions and informed trading decisions without overcomplicating the forex strategy.
This is how I stack confluence. The more factors I have in my favor, the higher the probability.
Final Thoughts
You do not need to trade exactly like I do, but you do need trading rules, structure, and confirmation.
You also need a stop loss that actually makes sense, which matters far more than past performance screenshots.
If you want a clean, repeatable SMC trading strategy, this entry model is a great place to start.
If you want a deeper breakdown of market structure and change of character, make sure to watch the SMC market structure video on the channel.
Trade well.
Source link