Understanding ICT Optimal Trade Entry OTE With Fibonacci
The Tool That Tells You Where to Actually Enter
Welcome back. Over the last twelve days you’ve learned to identify market direction, find key institutional zones, and read the chart like a professional. But there is one question every trader faces at the end of all that analysis:
The trend is confirmed. The structure is clear. Price is retracing. But where exactly do I enter?
The answer, in ICT methodology, is the Optimal Trade Entry. It is the most precisely defined entry framework in the entire ICT toolkit — and once you understand it, you’ll stop guessing at pull-back entries and start using a structured, repeatable approach that tells you exactly where the highest-probability entry sits on every retracement.
What Is the Optimal Trade Entry (OTE)?
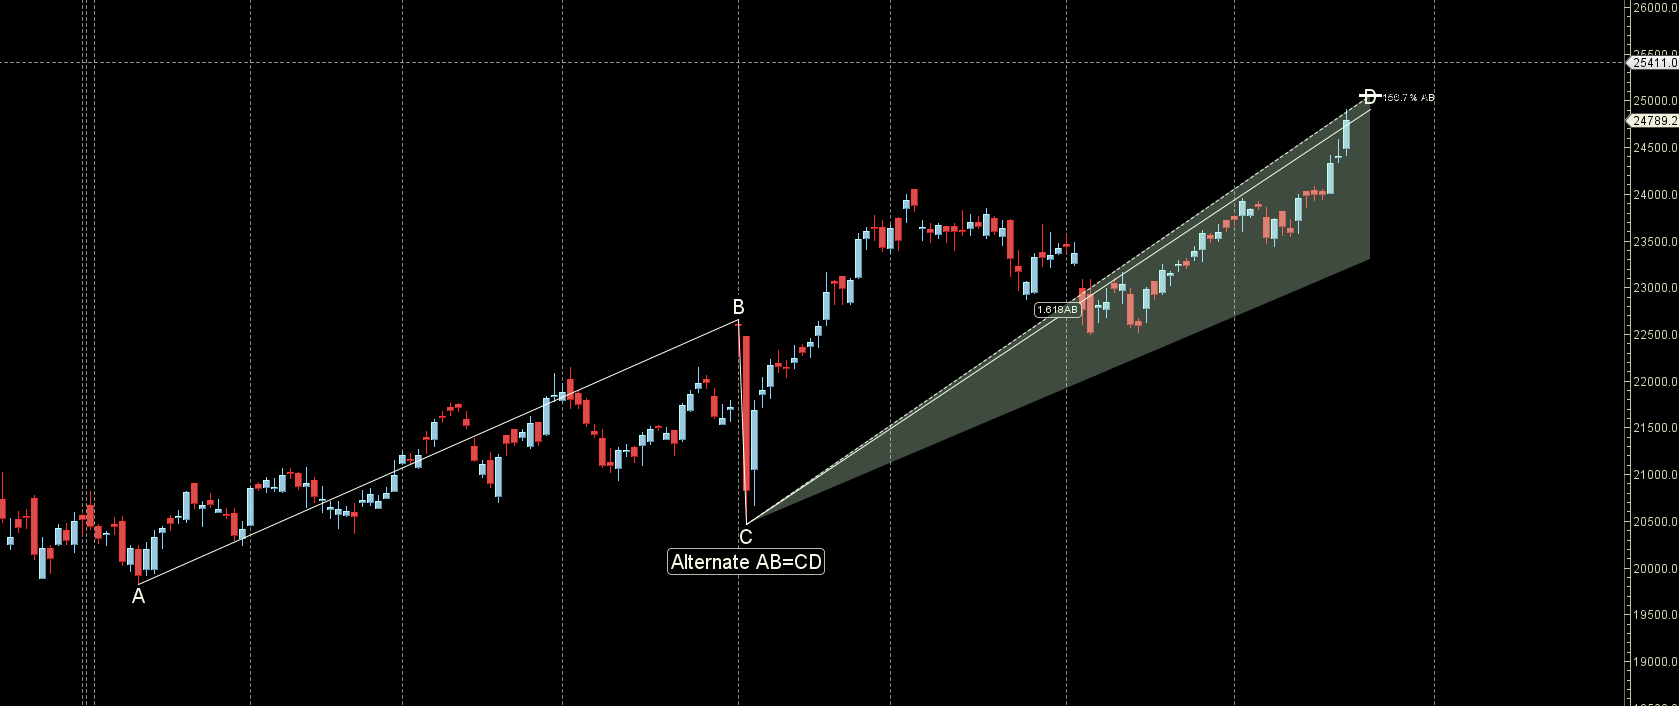
The Optimal Trade Entry is the Fibonacci-based zone where price is considered most likely to reverse and resume the prevailing trend. Specifically, it is the range between the 62% and 79% retracement levels of the most recent impulse swing, with 70.5% as the precise sweet spot at the centre.
The logic is elegant: when price makes an impulsive move and then retraces, it pulls back into a zone that is deep enough to offer a genuine discount (in an uptrend) or premium (in a downtrend) without invalidating the original move. The 62%–79% zone sits at a mathematically efficient point — deep enough that institutions can accumulate more orders at a favourable price, shallow enough that the structural bias hasn’t broken.
The 70.5% level specifically is not a standard Fibonacci number. It is the algorithmic midpoint between 61.8% and 79%, and it represents the level where institutional pressure is considered highest within the retracement window. Think of it as the compression point — the spring loaded to its tightest point before releasing.
How to Draw the ICT Fibonacci Tool Correctly
This is where most traders go wrong — and wrong Fibonacci placement produces wrong OTE levels every time.
For a bullish OTE: Identify the most recent clear swing low (the start of the impulse) and the swing high (the top of the impulse). Draw the Fibonacci tool from the swing low up to the swing high. The 0% level sits at the swing high, the 100% level sits at the swing low. The OTE zone — 62% to 79% — sits in the lower portion of the range, representing a discount area where you want to buy.
For a bearish OTE: Identify the swing high (start of the bearish impulse) and swing low (bottom of the impulse). Draw the tool from the swing high down to the swing low. The OTE zone — 62% to 79% — sits in the upper portion of the range, representing a premium area where you want to sell.
Critical tip: Draw Fibonacci from candle body to body — open to close — not wick to wick. Wicks are liquidity grabs and vary between brokers. Using candle bodies gives you the cleanest, most consistent OTE levels.
The key levels to show on your Fibonacci tool in ICT settings: 0.5 (equilibrium), 0.62 (OTE start), 0.705 (sweet spot), 0.79 (OTE end), 1.0 (invalidation), and extensions at -0.27 and -0.62 for targets.
 Explained — Fibonacci Levels &Amp; Strategy -- Ict Optimal Trade Entry Ote")
The ICT Fibonacci Level Setup
Standard Fibonacci tools show levels like 23.6%, 38.2%, 50%, and 61.8%. The ICT configuration uses a different set. Here is what you set on TradingView or MetaTrader to use the OTE correctly:
| Level | Label | Purpose |
| 0.0 | Swing high (0%) | Impulse top — price target zone |
| 0.5 | Equilibrium | Fair value midpoint — do not enter above this in a bullish retracement |
| 0.62 | OTE entry start | Enter here for aggressive entries |
| 0.705 | OTE sweet spot | Highest probability single entry level |
| 0.79 | OTE entry end | Deepest valid entry — beyond here, the idea is weakening |
| 1.0 | Swing low (100%) | Invalidation — stop below this |
| -0.27 | Target 1 | Standard institutional profit target |
| -0.62 | Target 2 | Deep expansion target for strong trend days |
The Key Rule Most Traders Miss — Equilibrium First
Here is the filter that separates disciplined OTE traders from everyone else: price must retrace below equilibrium (50%) before you consider entering.
If price pulls back only to 40% and reverses, it has not retraced deeply enough into discount territory. An entry from 40% retracement means your risk is larger relative to reward, and you’re entering before the institutional accumulation zone has been reached.
Only when price has crossed below the 50% level and entered the 62%–79% band does the OTE setup become valid. This single filter eliminates the majority of false entries and keeps you aligned with where institutional order flow is actually concentrating.
Stop Loss and Target Placement
Stop loss: Just below the 100% level — the original swing low for a bullish trade, or just above the 100% level (original swing high) for a bearish trade. If price closes beyond the swing that anchored your Fibonacci, the entire structural logic of the setup is invalidated.
Target 1 (-0.27): The standard institutional expansion target. This represents a symmetrical projection of the original impulse move and is where most intraday OTE setups reach their exhaustion point. Many ICT traders take partial profits here and move their stop to break-even.
Target 2 (-0.62): The deep expansion target, reserved for high-conviction days — strong news catalysts, clean daily trend alignment, or Kill Zone confirmation. This is the level that produces the very high risk-reward ratios ICT is known for.
How SMC Uses OTE Differently
SMC traders use the 62%–79% Fibonacci zone as a confluence tool rather than a standalone entry model. An SMC practitioner might say: “I have a daily demand zone here — let me also check if the OTE retracement aligns with the order block inside that zone.” When the OTE level falls within or overlaps a higher-timeframe order block or FVG, it creates a multi-layered confluence that dramatically strengthens the setup.
ICT treats OTE as a more rigid, time-confirmed framework — entries must happen during Kill Zones, the swing must have been formed by genuine displacement, and the Fibonacci anchor points are drawn with strict rules. For ICT, the 70.5% level is not just a guideline but the algorithmic re-entry point that Huddleston argues the market’s pricing algorithm is programmed to respect.
Both uses are valid. For beginners, the SMC approach — using OTE as additional confluence — is easier to start with. For those going deeper into ICT, mastering the precise drawing and timing rules produces cleaner, higher-probability entries.
The Five-Step OTE Checklist
Before entering any OTE trade, run through these five steps:
- Confirm the higher-timeframe bias — daily or 4H showing clear trend direction.
- Identify a valid impulse swing — formed by displacement, not a slow drift.
- Draw Fibonacci body-to-body — from the swing low to swing high (bullish), or swing high to swing low (bearish).
- Wait for price to cross below equilibrium — confirm it reaches the 62%–79% zone.
- Look for confirmation at the OTE — a CHoCH or FVG on the lower timeframe, or a reaction candle at 70.5%.
If all five align during a Kill Zone — you have an ICT-grade setup.
Up Next — Day 14
Tomorrow brings the final lecture of Week 2 — and one of the most important comparisons in this entire series. We put ICT’s PD Arrays side by side with SMC’s Points of Interest (POIs) in a full, detailed breakdown. Understanding the relationship between these two systems is what allows you to switch fluently between both methodologies — or combine them intelligently.
→ See you on Day 14.