Swing Trading: The Definitive 2024 Guide – Daily Price Action

Today I’m going to show you step-by-step how to profit from swing trading.
It’s a simple strategy I’ve used for years and works in various markets, including forex and crypto.
BONUS: Download a free PDF cheat sheet that shows you step-by-step how to swing trade, including setting entry points, targets, and stop losses. Plus, get my daily newsletter with exclusive Forex trade setups and strategies.
So if you’re ready to level up your trading game this year, stick around to the end.
Let’s begin!
Trading Styles vs. Strategies
Before we move on, it’s important to know the difference between styles and strategies.
As I mentioned above, there are far fewer trading styles than there are strategies.
Here are a few of the most popular styles:
- Swing trading
- Day trading
- Scalping (often a subset of day trading)
- Position trading
- High-frequency trading
Within each of these, there are hundreds if not thousands of strategies.
In other words, there are many different ways to day trade just as there are many ways to swing trade.
It’s up to each trader to make the style his or her own.
For instance, one day trader may use the 3 and 8 exponential moving averages combined with slow stochastics.
Another trader of the same style may use a 5 and 10 simple moving average with a relative strength index.
Both are considered day traders, but their strategies are different.
The same goes for swing trading.
The endless number of indicators and methods means that no two traders are exactly alike.
That’s especially true once you add human psychology as a variable.
In summary, trading styles define broad groups of market participants, while strategies are specific to each trader.
What is Swing Trading?
Here’s a quick video example to kick things off.
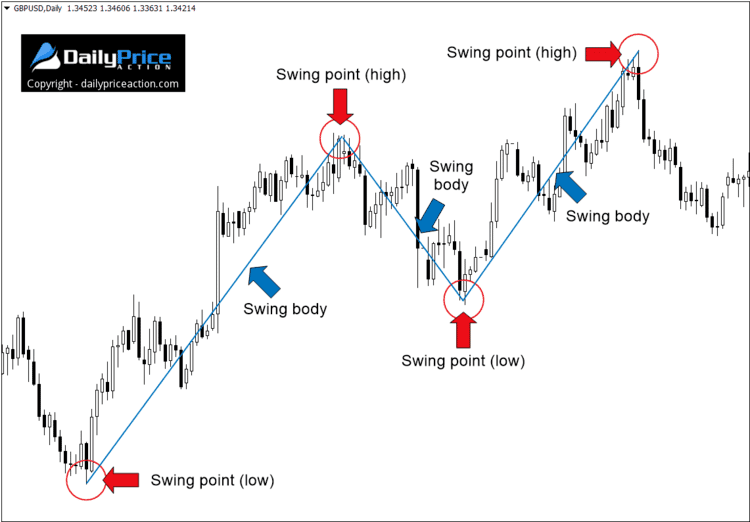
As the name implies, swing trading is an attempt to profit from the swings in the market.
These swings are made up of two parts—the body and the swing point.
As traders, it’s our job to time our entries in a way that catches the majority of each swing body.
While catching a swing point can be incredibly lucrative, it isn’t absolutely necessary.
In fact, attempting to catch the extreme tops and bottoms of swings can lead to an increase in losses.
The best way to approach these trades is to stay patient and wait for a price action buy or sell signal.
I’ll get into those various strategies shortly.
For now, just know that the swing body is the most lucrative part of any market move.
Later in this lesson, I will also show you a way to use those swing points to evaluate momentum.
The Best Strategy for Swing Trading
Step 1: Use the Daily Time Frame
I spend most of my time on the daily charts.
They offer a bigger picture of what’s happening with the price action and provide more reliable signals.
However, not all daily time frames are created equal.
I use a specific type of chart that uses a New York close.
Each 24-hour session closes at 5 pm EST, which is considered the Forex market’s unofficial closing time.
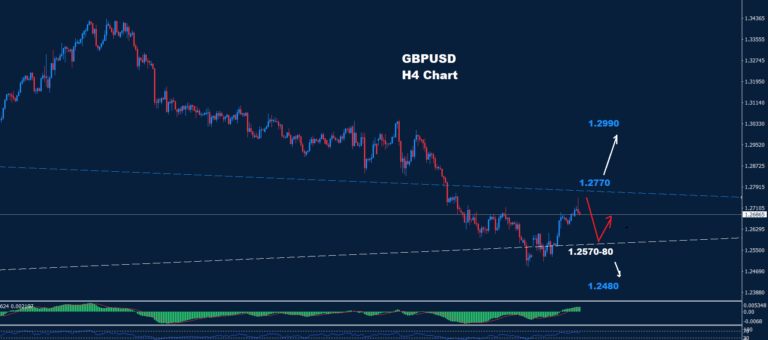
It is possible to use the 4-hour charts for swing trading, but I’ve found that the daily works best.
My suggestion is to start with the daily time frame.
Once you become profitable using the daily chart, feel free to move to the 4-hour time frame.
As a general rule, price action signals become more reliable as you move from the lower time frames to higher ones.
Step 2: Draw Key Support and Resistance Levels
Apart from Step 1, this is the most important piece of the entire process.
Think of drawing key support and resistance levels as building the foundation for your house.
It’s impossible to identify favorable swing trades without them.
Before I show you some examples using swing trades, let’s define the two types of levels.
Horizontal support and resistance
These are the most basic levels you want on your charts.
They provide a great foundation for trading swings in the market and offer some of the best target areas.
If you want to know how to draw support and resistance levels, see this post.
Trend lines
Not all technical traders use trend lines.
If I’m being honest, I have no idea why someone would ignore them, especially a swing trader.
They not only offer you a way to identify entries with the trend, but they can also be used to spot reversals before they happen.
Be sure to review the lesson I wrote on trend strength (see link above).
It will explain everything you need to know to use trend lines in this manner.
Step 3: Evaluate Momentum
At this point, you should be on the daily time frame and have all relevant support and resistance areas marked.
Remember how I mentioned using swing points to evaluate momentum earlier in the post?
Well, this is where those swing highs and lows come in handy.
There are three types of market momentum or lack thereof.
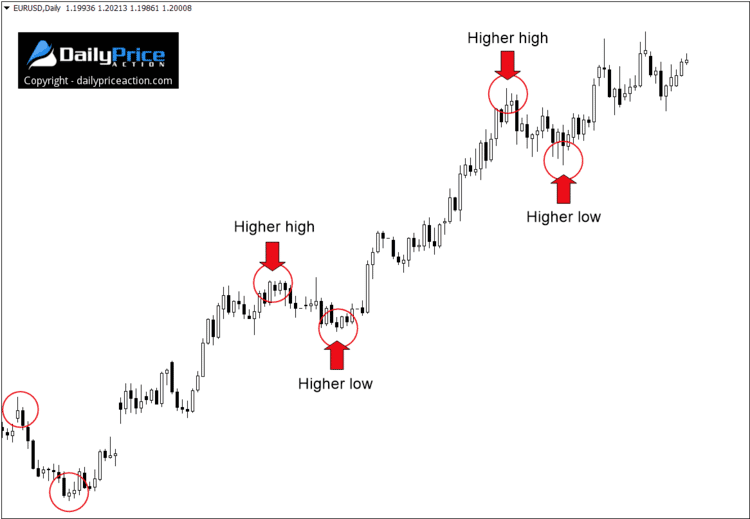
- Uptrend: Higher highs and higher lows
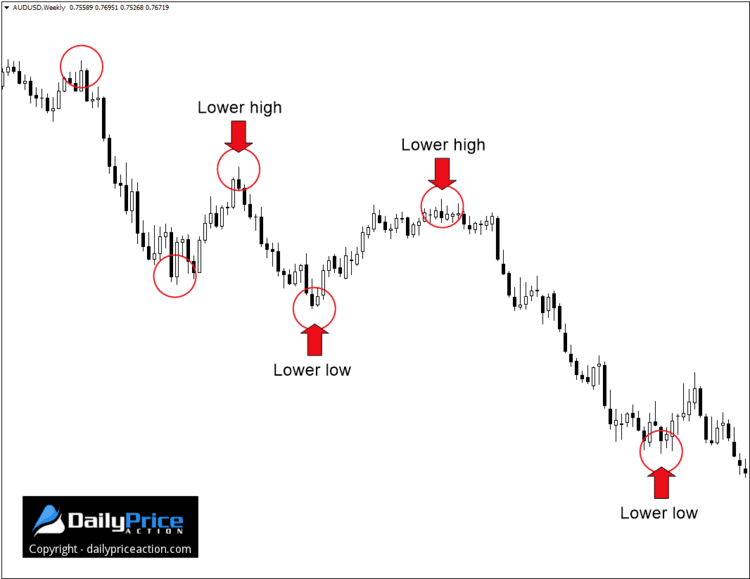
- Downtrend: Lower highs and lower lows
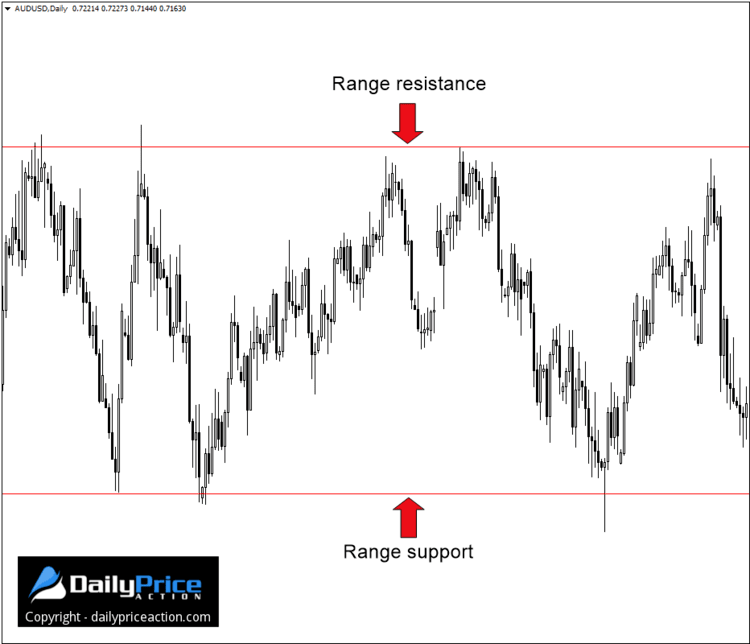
- Range: Sideways movement
A market that’s in an uptrend is carving higher highs and higher lows.
Notice how each swing point is higher than the last.
You want to be a buyer during bullish momentum such as this.
On the opposite end of the spectrum we have a downtrend.
In this case, the market is carving lower highs and lower lows.
You want to be a seller here.
The “swing” above is the heart of the swing trading strategy discussed here.
We’ll get into the various price action signals in the next step.
Last but not least is a ranging market.
As the name implies, this occurs when a market moves sideways within a range.
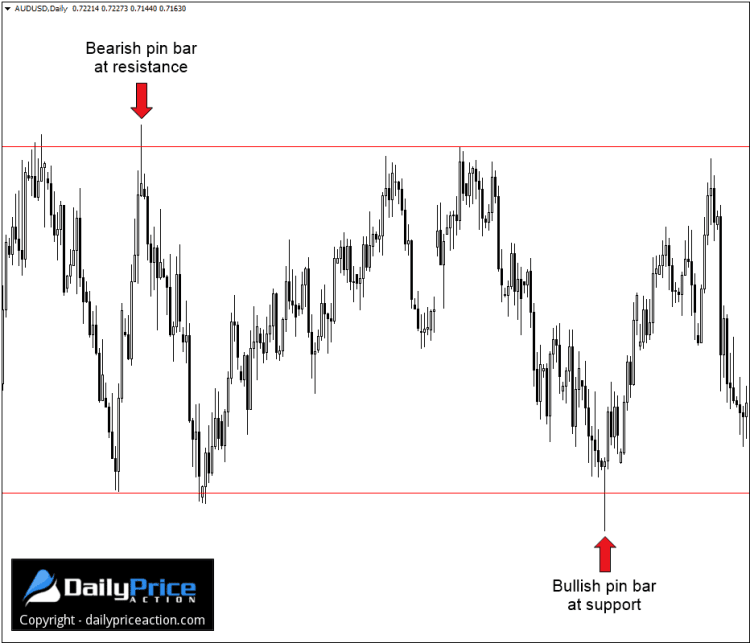
Although the chart above has no bullish or bearish momentum, it can still generate lucrative swing trades.
In fact, ranges such as the one above can often produce some of the best trades.
This is mostly due to the way that support and resistance levels stand out from the surrounding price action.
Just look at the two pin bars in the chart below.
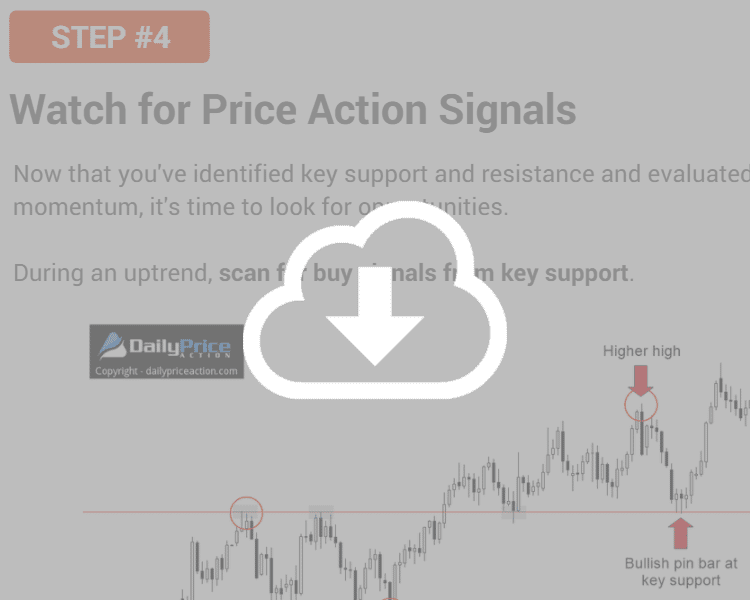
Step 4: Watch for Price Action Signals
Let’s review where you should be at this point in your swing trading journey.
Steps 1 and 2 showed you how to identify key support and resistance levels using the daily time frame.
Then in Step 3, you learned to evaluate the market’s momentum.
This tells you whether the market is in an uptrend, a downtrend or range-bound.
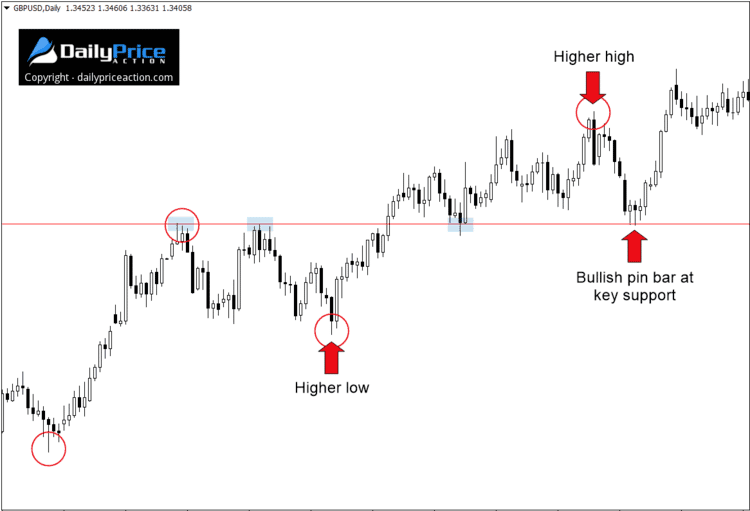
If the market is in an uptrend, you want to begin watching for buy signals from key support.
My two favorite candlestick patterns are the pin bar and engulfing bar.
You can learn more about both of these signals in this post.
Here is a great example of a bullish pin bar that occurred at key support during an uptrend.
The goal is to use this pin bar signal to buy the market.
By doing this, we can profit as the market swings upward and continues the current rally.
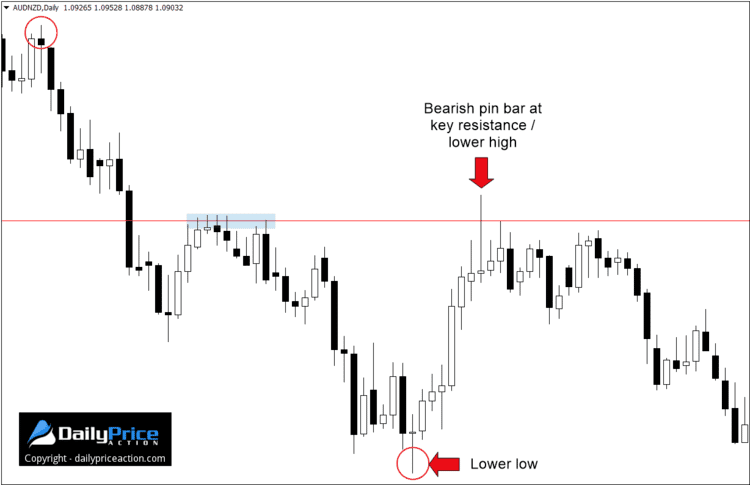
On the flip side, if the market is in a downtrend, you want to watch for sell signals from resistance.
Again, we use a signal like the pin bar to identify the swing high, also called the swing point.
You might not catch the entire swing, and that’s okay.
The idea is to catch as much of it as possible, but waiting for confirming price action is crucial.
When looking for setups, be sure to scan your charts.
Don’t make the mistake of searching for setups.
Those two actions may sound similar but they are far from it.
Scanning for setups is more of a qualitative process.
In other words, you’re scanning for the very best setups and if you don’t find anything, that’s okay.
Most traders feel like they need to find a setup each time they sit down in front of their computer.
This is called searching for setups.
So remember to scan for swing trade opportunities; never go searching for them.
Step 5: Identify Profit Targets and Stop Loss Levels
There are two rules when it comes to identifying exit points.
The first rule is to define a profit target and a stop loss level.
Many traders make the mistake of only identifying a target and forget about their stop loss.
Don’t make that mistake.
In order to calculate your risk as explained in the next step, you must have a stop loss level defined.
The second rule is to identify both of these levels before risking capital.
This is the only time you have a completely neutral bias.
As soon as you have money at risk, that neutral stance goes out the window.
It then becomes far too easy to place your exit points at levels that benefit your trade, rather than basing them on what the market is telling you.
So what’s the best way to identify your exit points?
Simple.
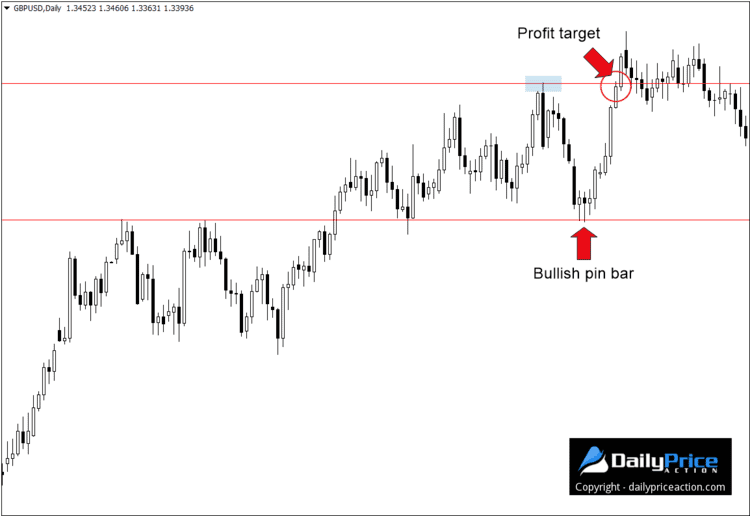
Just use the support and resistance levels you identified in Step 2.
Remember that bullish pin bar on the GBPUSD? (See Step 4 if you need a refresher.)
Here is a simple way to determine a profit target.
In this case, the GBPUSD rallied past our target, and that’s okay.
Remember that the goal is to catch the majority of the swing.
We don’t need to catch the entire move to make a profit.
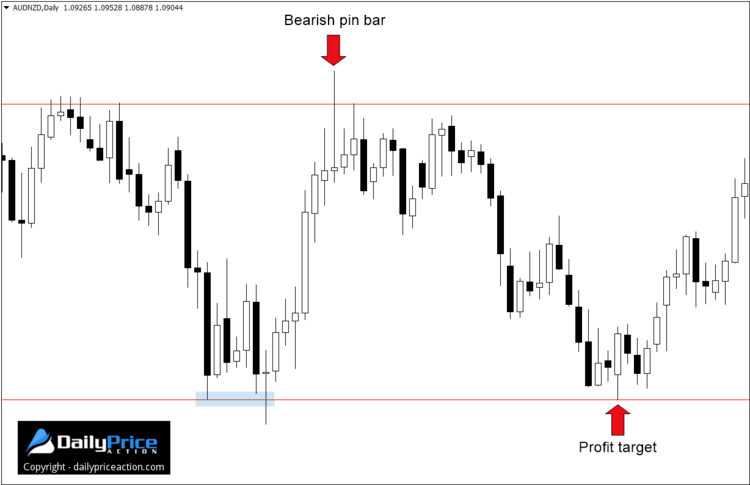
We can do the same thing with the AUDNZD bearish pin bar from Step 4.
Remember, those horizontal areas and trend lines are your foundation.
Once they are on your chart, use them to your advantage.
That involves watching for entries as well as determining exit points.
See this lesson to find out how I set and manage stop loss orders.
Step 6: Calculate and Manage Risk
Once you have identified your exit points for the trade, it’s time for some risk management.
Before I discuss how to identify stop loss levels and profit targets, I want to share two important concepts.
The first is R-multiples.
This is a way to calculate your risk using a single number.
For instance, a setup with a 100 pip stop loss and a 300 pip target is 3R.
Similarly, if your risk is $100 and you stand to make $500, the risk to reward ratio is 5R.
The second concept I want to discuss is asymmetry.
A favorable risk to reward ratio is one where the payoff is at least twice the potential loss.
Written as an R-multiple, that would be 2R or greater.
You can learn about both of these concepts in greater detail in this post.
When calculating the risk of any trade, the first thing you want to do is determine where you should place the stop loss.
For a pin bar, the best location is above or below the tail.
The same goes for a bullish or bearish engulfing pattern.
A stop loss that’s approximately 10 to 20 pips above or below the candlestick being traded is a good place to start.
Now that you have the stop loss placement identified, it’s time to determine the profit target.
This is where those key levels come into play once more.
Remember that when swing trading the goal is to catch the swings that occur between support and resistance levels.
So if the market is trending higher and a bullish pin bar forms at support, ask yourself the following question.
Where is the next key resistance level?
The answer will not only tell you where to place your target, but will also determine whether a favorable risk to reward ratio is possible.
If it is, then you may have a valid buying opportunity in front of you.
If not, you may want to stay on the sideline.
Day Trading vs. Swing Trading
On the opposite end of the spectrum from swing trading we have day trading.
These two couldn’t be further apart.
As you now know, the goal with swing trading is to catch the larger swings in the market.
Naturally, this requires a holding period that spans a few days to a few weeks.
Day trading, on the other hand, uses very short holding periods; sometimes just a few seconds.
There are other styles of trading, but these are two of the most popular.
I’ll get into some of the pros and cons of both, but first let’s take a look a simple 6-step process for swing trading.
Is Swing Trading Right for You?
There is no right or wrong answer here.
After more than a decade of trading, I found swing trades to be the most profitable.
Keep in mind that I’ve tried just about every trading style and strategy under the sun.
Before 2010 I experimented with everything from one-minute scalping strategies to trading Monday gaps.
However, just because swing trading Forex has worked for me doesn’t mean it won’t work for you.
Finding a profitable style has more to do with your personality and preferences than you may know.
In fact, if your chosen style doesn’t fit your personality, you are bound to struggle.
The key points below will help you decide if swing trading is right for you.
You might want to be a Forex swing trader if:
– You don’t mind holding trades for several days
Most Forex swing trades last anywhere from a few days to a few weeks.
This means holding positions overnight and sometimes over the weekend.
There are, of course, a few ways to manage the risks that accompany a longer holding period.
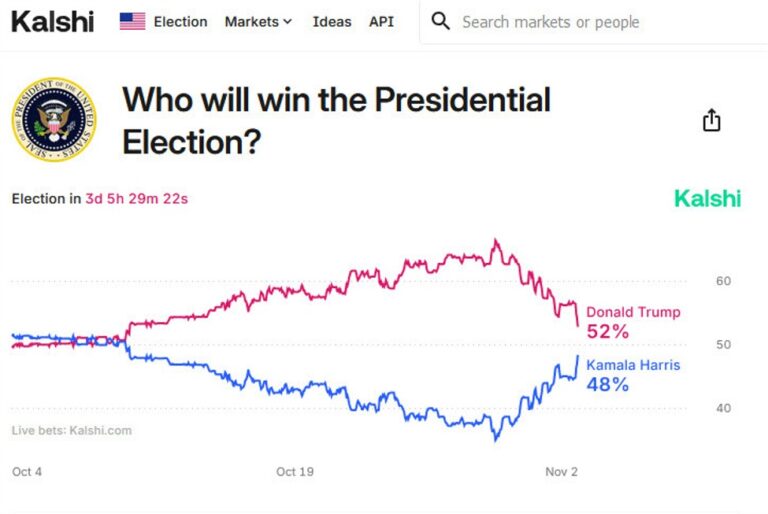
One way is to simply close your position before the weekend if you know there is a chance for volatility such as a government election.
– You want more freedom with your time
Swing trading is what allowed me to start Daily Price Action in 2014.
Without using this style of trading, there is no way I’d have the time to maintain this website.
On average, I spend no more than 30 or 40 minutes reviewing my charts each day.
Spending more time than this is unnecessary and would expose me to the risk of over-trading.
– You don’t mind taking fewer trades but making more on each one
Because swing trading works best on the higher time frames, opportunities are limited.
You may only get five to ten setups each month.
However, the return from each one can be much greater than those who day trade.
For instance, my minimum risk to reward ratio is 3R.
That means for every 1% of my account balance at risk, I stand to make a 3% profit.
– You’re looking for a slower paced style of trading
When it comes to trading Forex, slow isn’t a bad thing.
In fact, a slower paced style like swing trading gives you more time to make decisions which leads to less stress and anxiety.
So, if you’re looking for a more relaxed way to trade the market, this trading style might be the answer.
– You have a full-time job or school
I wasn’t always a stay at home trader.
Having the ability to trade Forex around my work schedule was a huge advantage.
Had I needed to sit in front of my charts all day to watch every tick, it wouldn’t have been possible.
This is the kind of freedom swing trading can offer.
You might NOT want to be a Forex swing trader if:
– You’re looking for an action-packed style of trading
There is nothing fast or action-packed about swing trading.
It’s a style where the slower-paced, more disciplined traders win.
I will go as far as to say that if your holding period is more than a few days and your trading isn’t boring, you’re doing something wrong.
– You don’t mind making a small amount on each position
As a swing trader, your average profit for a successful trade might be 2% or greater.
Most day traders, on the other hand, make a much smaller amount per profitable trade.
They make up for it in volume, but the return per execution is relatively small.
– You can’t stand the idea of holding positions overnight
Most swings last anywhere from a few days to a few weeks.
As such, swing traders will find that holding positions overnight is a common occurrence.
If you can’t sleep knowing you have capital at risk or unrealized profit at stake, then swing trading might not be for you.
– You need to know if you’re right or wrong immediately
I have held several positions for over a month.
Some have even lasted for two or three months, particularly when I’ve traded a reversal on the weekly time frame.
Longer-term trades such as this require patience.
It may take several days, weeks, and sometimes months before you know if your analysis was correct.
That said, trailing your stop loss to lock in some profit along the way does help to relieve most of that pressure.
– You get anxious when trades go against you
In most cases, the market won’t take off in your intended direction right away.
Drawdown is something all traders have to deal with regardless of how they approach the markets.
However, drawdown can last longer for a swing trader.
It doesn’t mean you stand to lose more money, but positions can remain negative much longer than if you were day trading.
Final Words
Forex swing trading is one of the most popular trading styles around, and for good reason.
It allows for a less stressful trading environment while still producing incredible returns.
It’s also great if you have a day job or school to attend.
Having accurate levels is perhaps the most important factor.
If you can’t rely on the support and resistance levels on your chart, you won’t be able to trade with confidence.
In my experience, the daily time frame provides the best signals.
Just make sure you use New York close charts where each session ends at 5 pm EST. Check with your broker to be sure.
The best way to remove emotions from trading and ensure a rational approach to the markets is to identify exit points in advance.
If you wait until you have an open position, it’s too late.
Above all, stay patient. Remember that it only takes one good swing trade each month to make considerable returns.
What is swing trading?
Swing trading is a style of trading whereby the trader attempts to profit from the price swings in a market. These positions usually remain open for a few days to a few weeks.
Is swing trading still profitable?
Absolutely! If you stick to the steps discussed in this post, you can profit from swings in the market, whether it be forex, crypto or another market.
What is the difference between day trading and swing trading?
Day trading is a style of trading where positions are opened and closed within the same session. Swing trading, on the other hand, uses positions that can remain open for a few days or even weeks.
What time frame is best for swing trading?
Most swing traders prefer the daily time frame for its significant price fluctuations and broader swings. However, the weekly and even 4-hour time frames can be used to complement the daily time frame.
Before You Go…
I created a free swing trading PDF cheat sheet that you can use to quickly learn how to swing trade, including where to enter and exit the market for the most profitable trades.
The cheat sheet contains detailed steps on how to swing trade with examples.
Click below to download the free cheat sheet:
Source link